| Introduction |
The fun of having a powerful PC is getting more and more drowned out by the annoying noise the fans make to keep your top-of-the-line equipment from frying out in barely three seconds.
Having purchased an AMD Athlon XP 1600+, clocking at 1.4Ghz, I found the sound level to be rather high. And I knew that another upgrade would come around, one day or another.
So I decided something had to be done, or else I would wind up not being able to turn on my PC in the evenings when my daughter is sleeping !
I have been following up on PC cooling technologies for a while. Some people do crazy things, like preparing a bath of liquid nitrogen to keep their super-duper overclocked-to-the-max PC from melting. But I had something a bit less extreme in mind.
I was therefor delighted when I read on Tom's Hardware that watercooling was finally becoming a viable technique for the PC. As soon as I found a kit available online ( at OC-Card), I ordered it, and here is what I got.
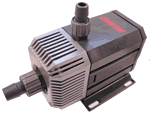
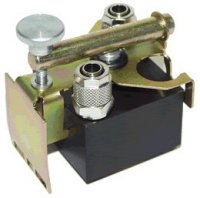
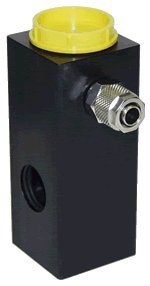
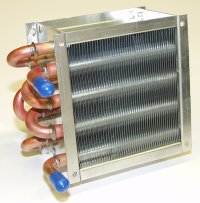
| The Watercooling Kit - Starter Pack |
|
|
|
|
| Putting the Kit Together |
Although I have a fair amount of experience in taking apart PCs and putting them back together, I must admit that, once the kit had arrived, I experienced a certain uneasiness with the prospect of putting tubes filled with water next to my precious electrical computer components.
Thankfully, Tom's Hardware had put together a magnificent article explaining just how to do things and what to pay attention to. It couldn't have been written at a better time !
The explanation being given in the article, with a great film to watch, I will not bore you with technical details. Let me just say that I should have been more careful with my screwdriver in trying to remove the old CPU fansink. If I had paid more attention, I would have avoided having to buy a new motherboard. Grrr.
Anyway, here is what the PC looks like now.
| A Look Inside |
 |
 |
 |
| Explaining the Circuit |
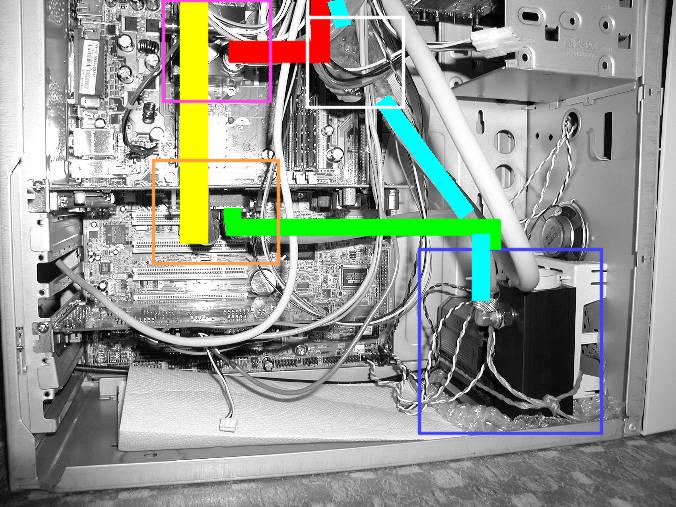
In the image above, you can see how it works. The pump is in the blue square. It is linked via the green line to the graphics card (orange square), which cools the NV25 with the coolest water. From there, the now very warm water follows the yellow line to the CPU (violet square). There, the water pics up a little more heat and then follows the red line to the radiator (not on image).
Coming back from the radiator, the water follows the cyan line through the flow counter (white square), and the cycle starts over again.
| Turning it on |
The first time I turned on the system, I was a bit apprehensive. Had I put enough thermal paste ? Had I mounted the heat exchanger correctly ? Will it work ?
As it turns out, it worked, and far better than I had expected. The pics are of the current situation, but initially I had not bought the module for cooling the graphics card. So only the CPU was watercooled. There was a difference in the noise level, but I was disappointed to find that my PC was making just about as much noise as before. As far as cooling is concerned, this rig is great. I played Quake III for two straight hours, and the radiator stayed cold. I left the PC working on Seti for a full night, and the next morning the radiator was barely lukewarm. If you install this for a CPU-only operation, I deem you have a large margin of upgrades before getting to the limits of it heat absorption ability.
When I received and mounted the module for the graphics card, I was rewarded with a much quieter noise level. My PC is once again a silent little mouse, albeit with a large proficiency for gaming.
With the graphics card being cooled also, the heat picture changed somewhat. Indeed, even without playing 3D games, the radiator is now continuously warm - though it never gets hot. Even with Seti or playing Unreal 2, the radiator just stays warm to the touch.
Clearly, there are two possibilities here. Either cooling two chips is much more demanding than cooling just the CPU, or graphics chips heat up a lot more than CPU chips do. Now, given the size of the fansinks for CPUs, I doubt that graphics chips can heat up so much more than CPU chips. If fan size is proportional to heat dissipation, that is certainly not the case. I will have to discuss the fact with someone who understands thermodynamics, I guess.
Whatever the answer is, with future versions of graphic chips (NV35 et al.) I will probably have to think about branching the water flow. There are y-links that exist to seperate a flow in two or join two flows together. That way, from the pump I'll divide the flow to both the graphics chip and the CPU, then unite the two flows to the radiator. If the water pressure remains sufficient, then that will probably be the best solution to ensure that both critical components will remain adequately cooled.
| Conclusion |
I have tried watercooling, and now I'm hooked. It is great, I feel much more secure about the PC and I am confident that I have no more need to change my cooling system for a good number of upcoming upgrades.
It is true that the initial expense was rather high, running into the area of €350 just for the material and shipping costs, but I regret that I was not able to purchase such a solution a few years ago. If I total the number of fansinks I have had to buy in each of my CPU upgrades, I am sure that the cost of this one cooling solution is not so far above all those individual purchases.
I guess that means that, for my fellow upgrade freaks out there, this solution is the best thing since bacon and eggs. Great cooling power, great longevity, remarkable silence and bragging rights to top it all off.
The only functional drawback is that there are now two cables to plug in for this PC to work, one for the power unit and one for the pump. And you better not forget the pump !